The training begins!

We realized on Friday that there were only 77 days until the start of our tour, so we decided to ride 77 miles this weekend to kick-start our training.  The weather in State College has been so awful that we have been taking the bus to school, bringing our riding time down to nearly zero.  This weekend, however, was sunny and warm.  Perfect!

The snow is finally off the road!  A beautiful day to ride.

The snow is finally off the road! A beautiful day to ride.

We took off from school early on Friday and took a mostly peaceful 30 mile ride.  At one point, however, we got chased by three very aggressive turkeys in the middle of the road!  They were huge, with scary blue and red faces.  As we approached we saw them try to attack a pick-up truck.  We pedaled past as quickly as we could, but they pursued us for a moment even after we were safely away. That certainly got our blood pumping!

A lunch reminiscent of the Pacific Northwest

A lunch reminiscent of the Pacific Northwest

We rode a 47 mile loop on Saturday through farmland and small Pennsylvania towns.  The wind was pushing us along for the first half of the ride, so we made excellent time on the way out.  We stopped for lunch at a small church – yay for smoked salmon and bagels!

The terrain in central Pennsylvania is surprisingly varied, even in the valley that Penn State sits in.  On one side of the valley lays an abundance of small hills divided by streams.  On the other side the scenery is open and windswept.  We certainly noticed the wind when we turned around and came out of the trees.  A strong headwind accompanied us back.

Winter is still here - I cannot wait until there are leaves on these trees again.

Winter is still here – I cannot wait until there are leaves on these trees again.

My favorite part of the ride was stopping at a little country store just north of the small town of Centre Hall.  They sell pickled eggs and beets for 50 cents an egg.  Each egg includes one pickled beet.  We stopped for a rest to eat the bright pink eggs.

DSC08424

A pickled egg to match my socks!

During our tour, a 47 mile day will be typical, or even a little short, so we will need to get in shape to handle this kind of mileage regularly.  We were tired by the time we got back home though, it is only the beginning of training after all!

We hope to start doing overnights in late March when the weather is better and we return from a spring break trip out west.  Until then, we will try to fit in day rides anytime the roads are clear.

The streams were full from the snow melt everywhere we went.

The streams were full from the snow melt everywhere we went.

Here is a map of the route, for the interested.

47 mile loop

47 mile loop


Training in Spain’s Canary Islands – Part 2: Tenerife

A few weeks ago I wrote a post about riding on El Hierro, the smallest of all seven Canary Islands.  Over winter break I spent about a week there with my host family and my Brompton folding bicycle.  After the new year dawned (welcome 2014!) we caught a ferry to go to Tenerife, the largest of the islands.

Overview of Tenerife - I spent all my time this year in the northernmost part of the island.

Overview of Tenerife – I spent all my time this year in the northernmost part of the island.

The red dot in the figure to the left marks El Teide – the highest peak in all of Spain.  It rises 12,198′ above the sea in only 4.5 miles (as seen from above).  The entire island is very mountainous, and riding through the various elevations showcases a fantastic diversity of plant life.  The warm temperature and polite cars certainly added to the wonderful time I had cycling!

I did three main cycling day trips during my time there.  The first trip was the most ambitious:  I started in the university town of La Laguna, and climbed into the scenic, northern part of the island.  This area is mainly a national protected area.  Unfortunately, it is also famous for the clouds that form when the warm ocean air hits the steep hills.  On this particular day, the clouds were out in full force and I even got rained on.  The ride was still stunning, however.

Looking back at La Laguna as I climb into the hills.

Looking back at La Laguna as I climb into the hills.

Within an hour I was out of the heavily populated zone and into the protected area.  The trees grew over the roadway, the pavement was smooth, and traffic was sparse due to the cloud cover and the extreme curviness of the route.

A view of the Atlantic between slivers of hills.

A view of the Atlantic between slivers of hills. Notice the red house perched precariously on the cliff.

DSC08199To the left is the road I traveled on.  At this point a couple of men got out of their car to take a photo.  They complained of the cold weather.  It was about 50 that day, and I smiled and told them how cold it was at that moment in Pennsylvania.  They gasped obligingly.


DSC08223

A particularly photogenic curve in the road.

There is a sheer drop on either side of the road here.

There is a sheer drop on either side of the road here.

Eventually, I began to descend back to sea level.  It was a very long descend, but it was wondrous to finally emerge from the clouds to find a warm, sunny day below.  The road ended in the small town of San Andres.  Most of the houses here are built into the steep walls of the mountains, and the region is famous for its seafood stews.

Finally! Out of the clouds!

Finally! Out of the clouds!

San Andres in sight - buildings constructed on the sides of the steep hills.

San Andres in sight – buildings constructed on the sides of the steep hills.

San Andres is connected to the big city of Santa Cruz by a narrow strip of highway next to the ocean.  There is a nice pedestrian walkway the entire length of the road, which I used to arrive quickly.  Once in the city I folded the Brompton up and boarded the light rail to return to La Laguna, where my family was waiting.  It was a beautiful little loop!

My other two day rides were in the same protected areas, but on lesser-traveled roads and on sunnier days.  I even met up with a trio of touring cyclists one day!

I made these three touring cyclists who later set up camp at this spot.  They spoke neither English nor Spanish, so our communication was rather limited

I met these three touring cyclists who later set up camp at this spot. They spoke neither English nor Spanish, so our communication was rather limited.

The Brompton and El Teide.  The little bike that could, as I call it, is posed in front of Spain's tallest peak.

The Brompton and El Teide. The little bike that could, as I call it, is posed in front of Spain’s tallest peak.

One last picture of the Brompton on Tenerife.  Gran Canaria, another island, rises above the clouds in the background.

One last picture of the Brompton on Tenerife. Gran Canaria, another island, rises above the clouds in the background.


Predicting the weather

Predicting the weather is not a trivial matter when traversing multiple continents over the course of more than a year. We need to have an idea of what the temperature will be to make sure we have enough warm things. And, almost as importantly, to make sure we’re not carrying around unnecessary clothing (weight savings!).

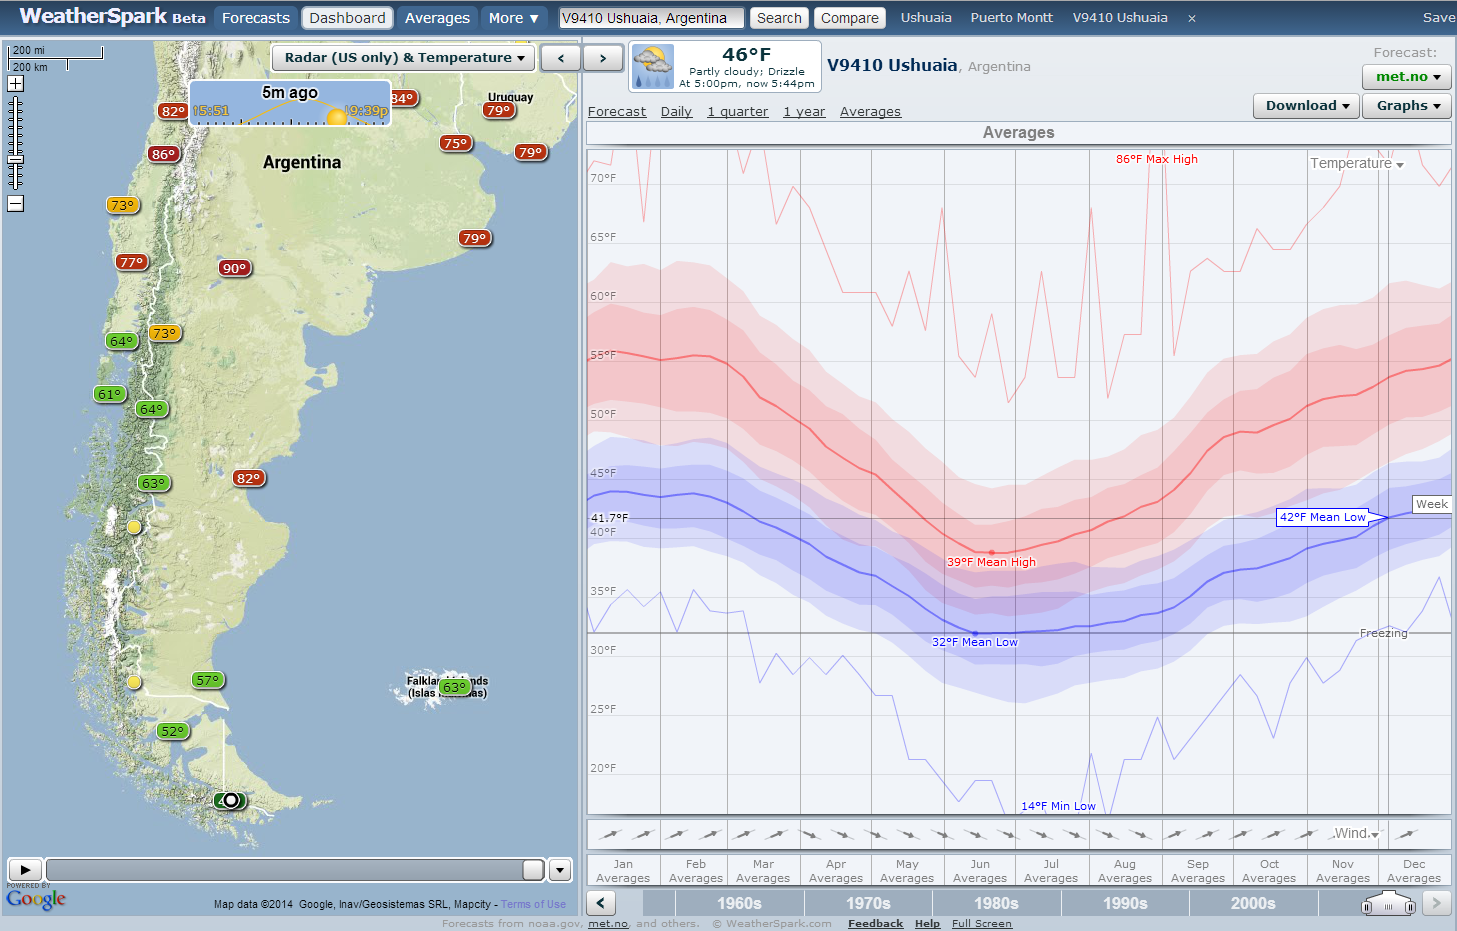
At many weather sites you can search for a city and then look up the monthly temperature averages, but this is cumbersome. I don’t have a list of cities handy, and my understanding of the geography for the entire trip is limited. I was recently introduced to WeatherSpark.com and now I’m a big fan. It doesn’t just give you weather averages, but makes pretty graphs and has a ton of features. Check out this screenshot.

screenshot from WeatherSpark

Map of weather stations and temperature averages from WeatherSpark.com. Note the range of highs (reds) and lows (blues). Weather is highly variable!

Recently I planned a rough guess of the countries and the month we might pass through. Then, I powered up WeatherSpark to see which cities there were data for. Not only can I navigate easily between cities (and even know which cities there are data for), I can plot yearly curves of temperature. And they aren’t just average temperatures, but a distribution. This is very important, since temperatures tend to be highly variable! Needless to say, I am impressed.

Soon after I realized you could plot about 15 different weather variables and I got more excited. As a cyclist, the main weather concern is temperature. However, rainfall (or, dare I say it, snow!) and strong headwinds are definitely worth watching out for. When you’re outside almost the entire day, you want to make sure you will be comfortable.

OK. I’m done raving about the website; let’s look at what information I gathered. 

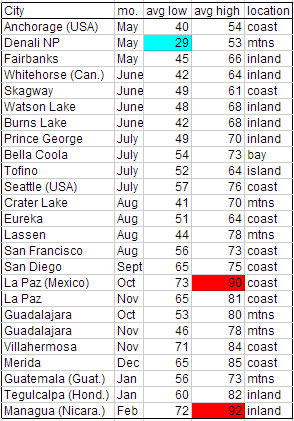
temperature table, Alaska to Nicaragua

Average temperatures for the first half of the trip.

Our start date is fixed because we already bought airplane tickets. It looks like it will be pretty cold in Denali NP, at 29°F (-2°C) for the average low in May. Brrr. But, we knew that already, and we bought some warm sleeping bags and other gear for the cold weather. We’ll keep our fingers crossed that a cold snap doesn’t hit while we’re there!

The next thing I was curious about was Mexico. We don’t want to get there too soon and be roasted as we travel through the desert down the Baja California peninsula. It looks like it will be a toasty 90°F (32°C) for the average high in October! Honestly, this wasn’t as bad as I was expecting. That is probably because La Paz is on the coast. In any case, it will still encourage us to spend a little more time in the US to wait out the hot summer temperatures.


What I really didn’t know about was what the weather would be like way down south – for the last couple months nearing Ushuaia. The good news is that it should be right on par with the temperatures at the start of our trip, in Alaska and Yukon. Lows near 40°F (4°C) are quite bearable when camping. (Or you can at least agree that we will have tested our gear already to know!)

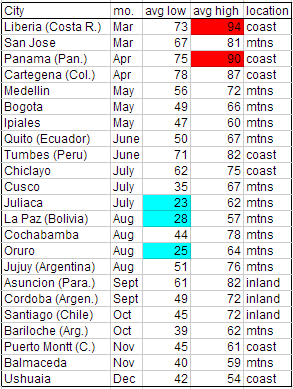
temperature table, costa rica to chile

Average temperatures for the second half of the trip.

The big surprise for me was how cold the nights will be in the high elevations in Peru and Boliva. We’re talking about places only about as far south of the equator as the Yucatan peninsula is north of the equator. The average lows are below freezing in places like Juliaca, Peru (12,549’, 3825 m), La Paz, Boliva (11,913’, 3631 m), and Oruro, Bolivia (12,159’, 3709 m). Who knows how cold it will get on other mountain passes — where there wasn’t temperature data for me to look up. Hopefully not much colder, but I guess we’ll find out next year!

What to bring: Sleeping gear for camping

This is the first in a series of posts about specific gear that we plan to bring on our trip.

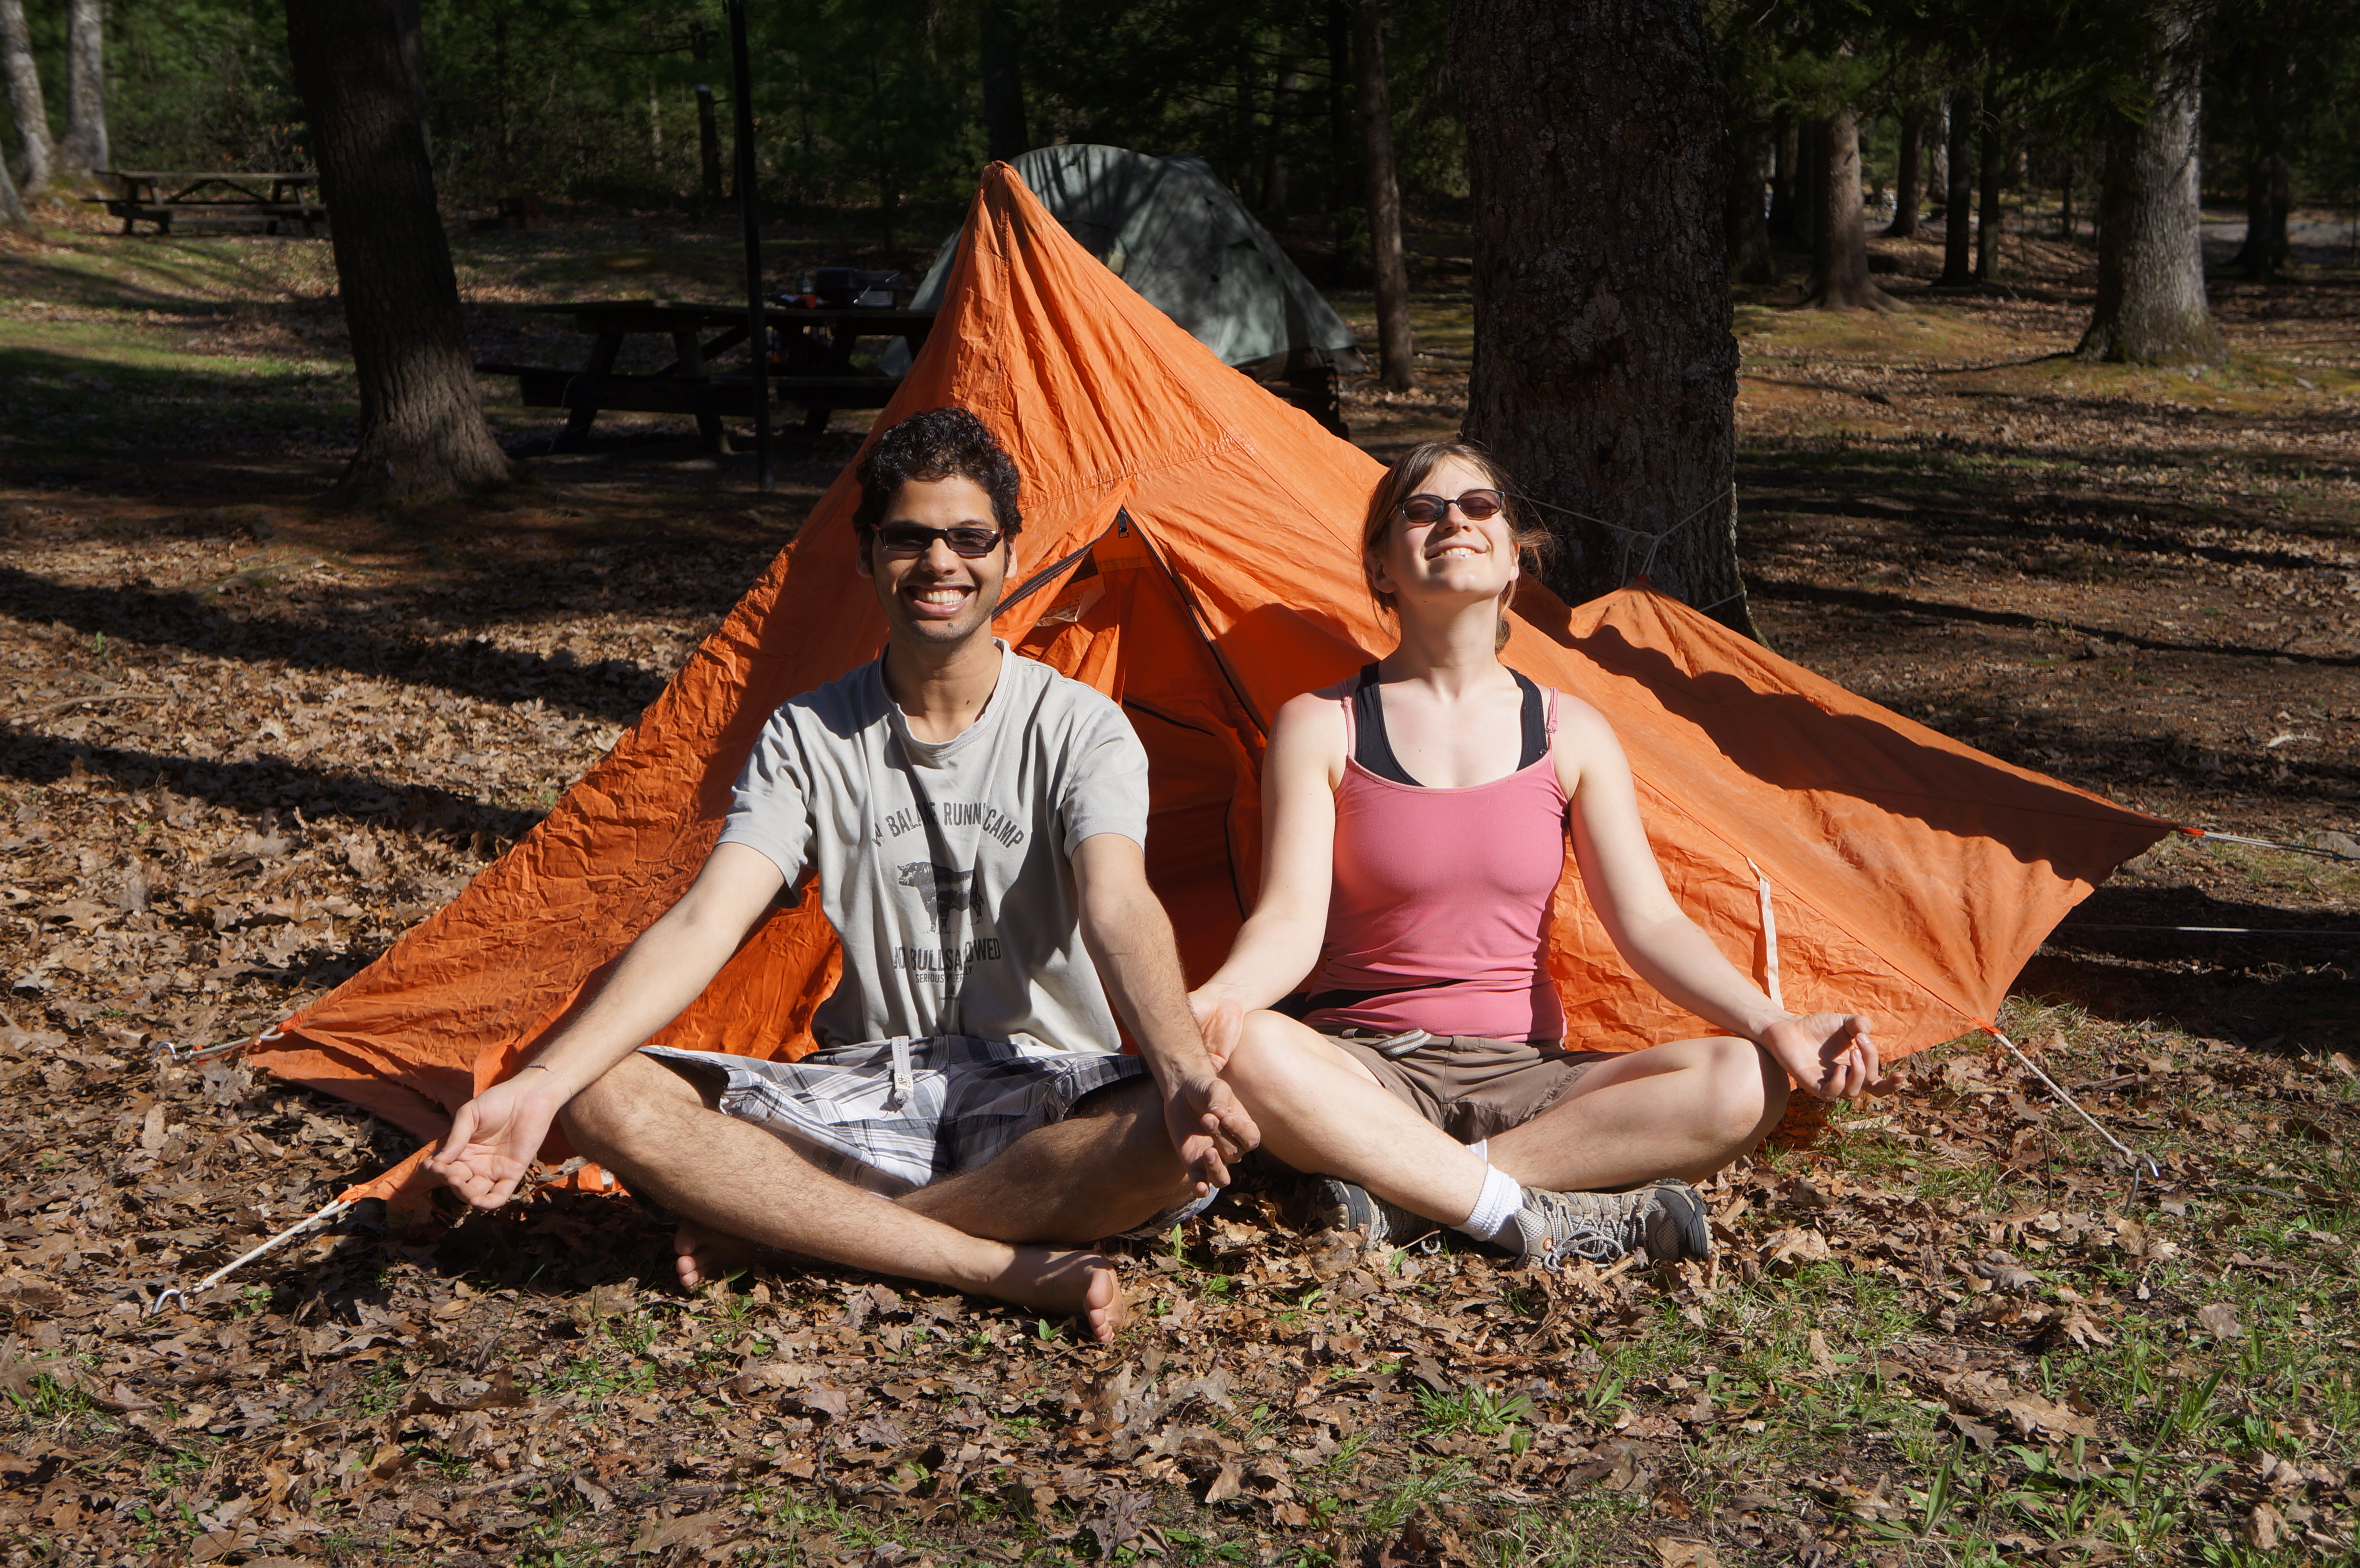
tent with meditators

A comfortable position for meditation, but a sad looking tent!

We’ll be camping many nights on our upcoming trip. For that reason, it is important to be comfortable while in our tent – whether the conditions are cold or hot, wet or dry. Once you’re on the road long enough, you will hit all conditions, including those most unpleasant. Let’s take a look at the gear we’ll bring.

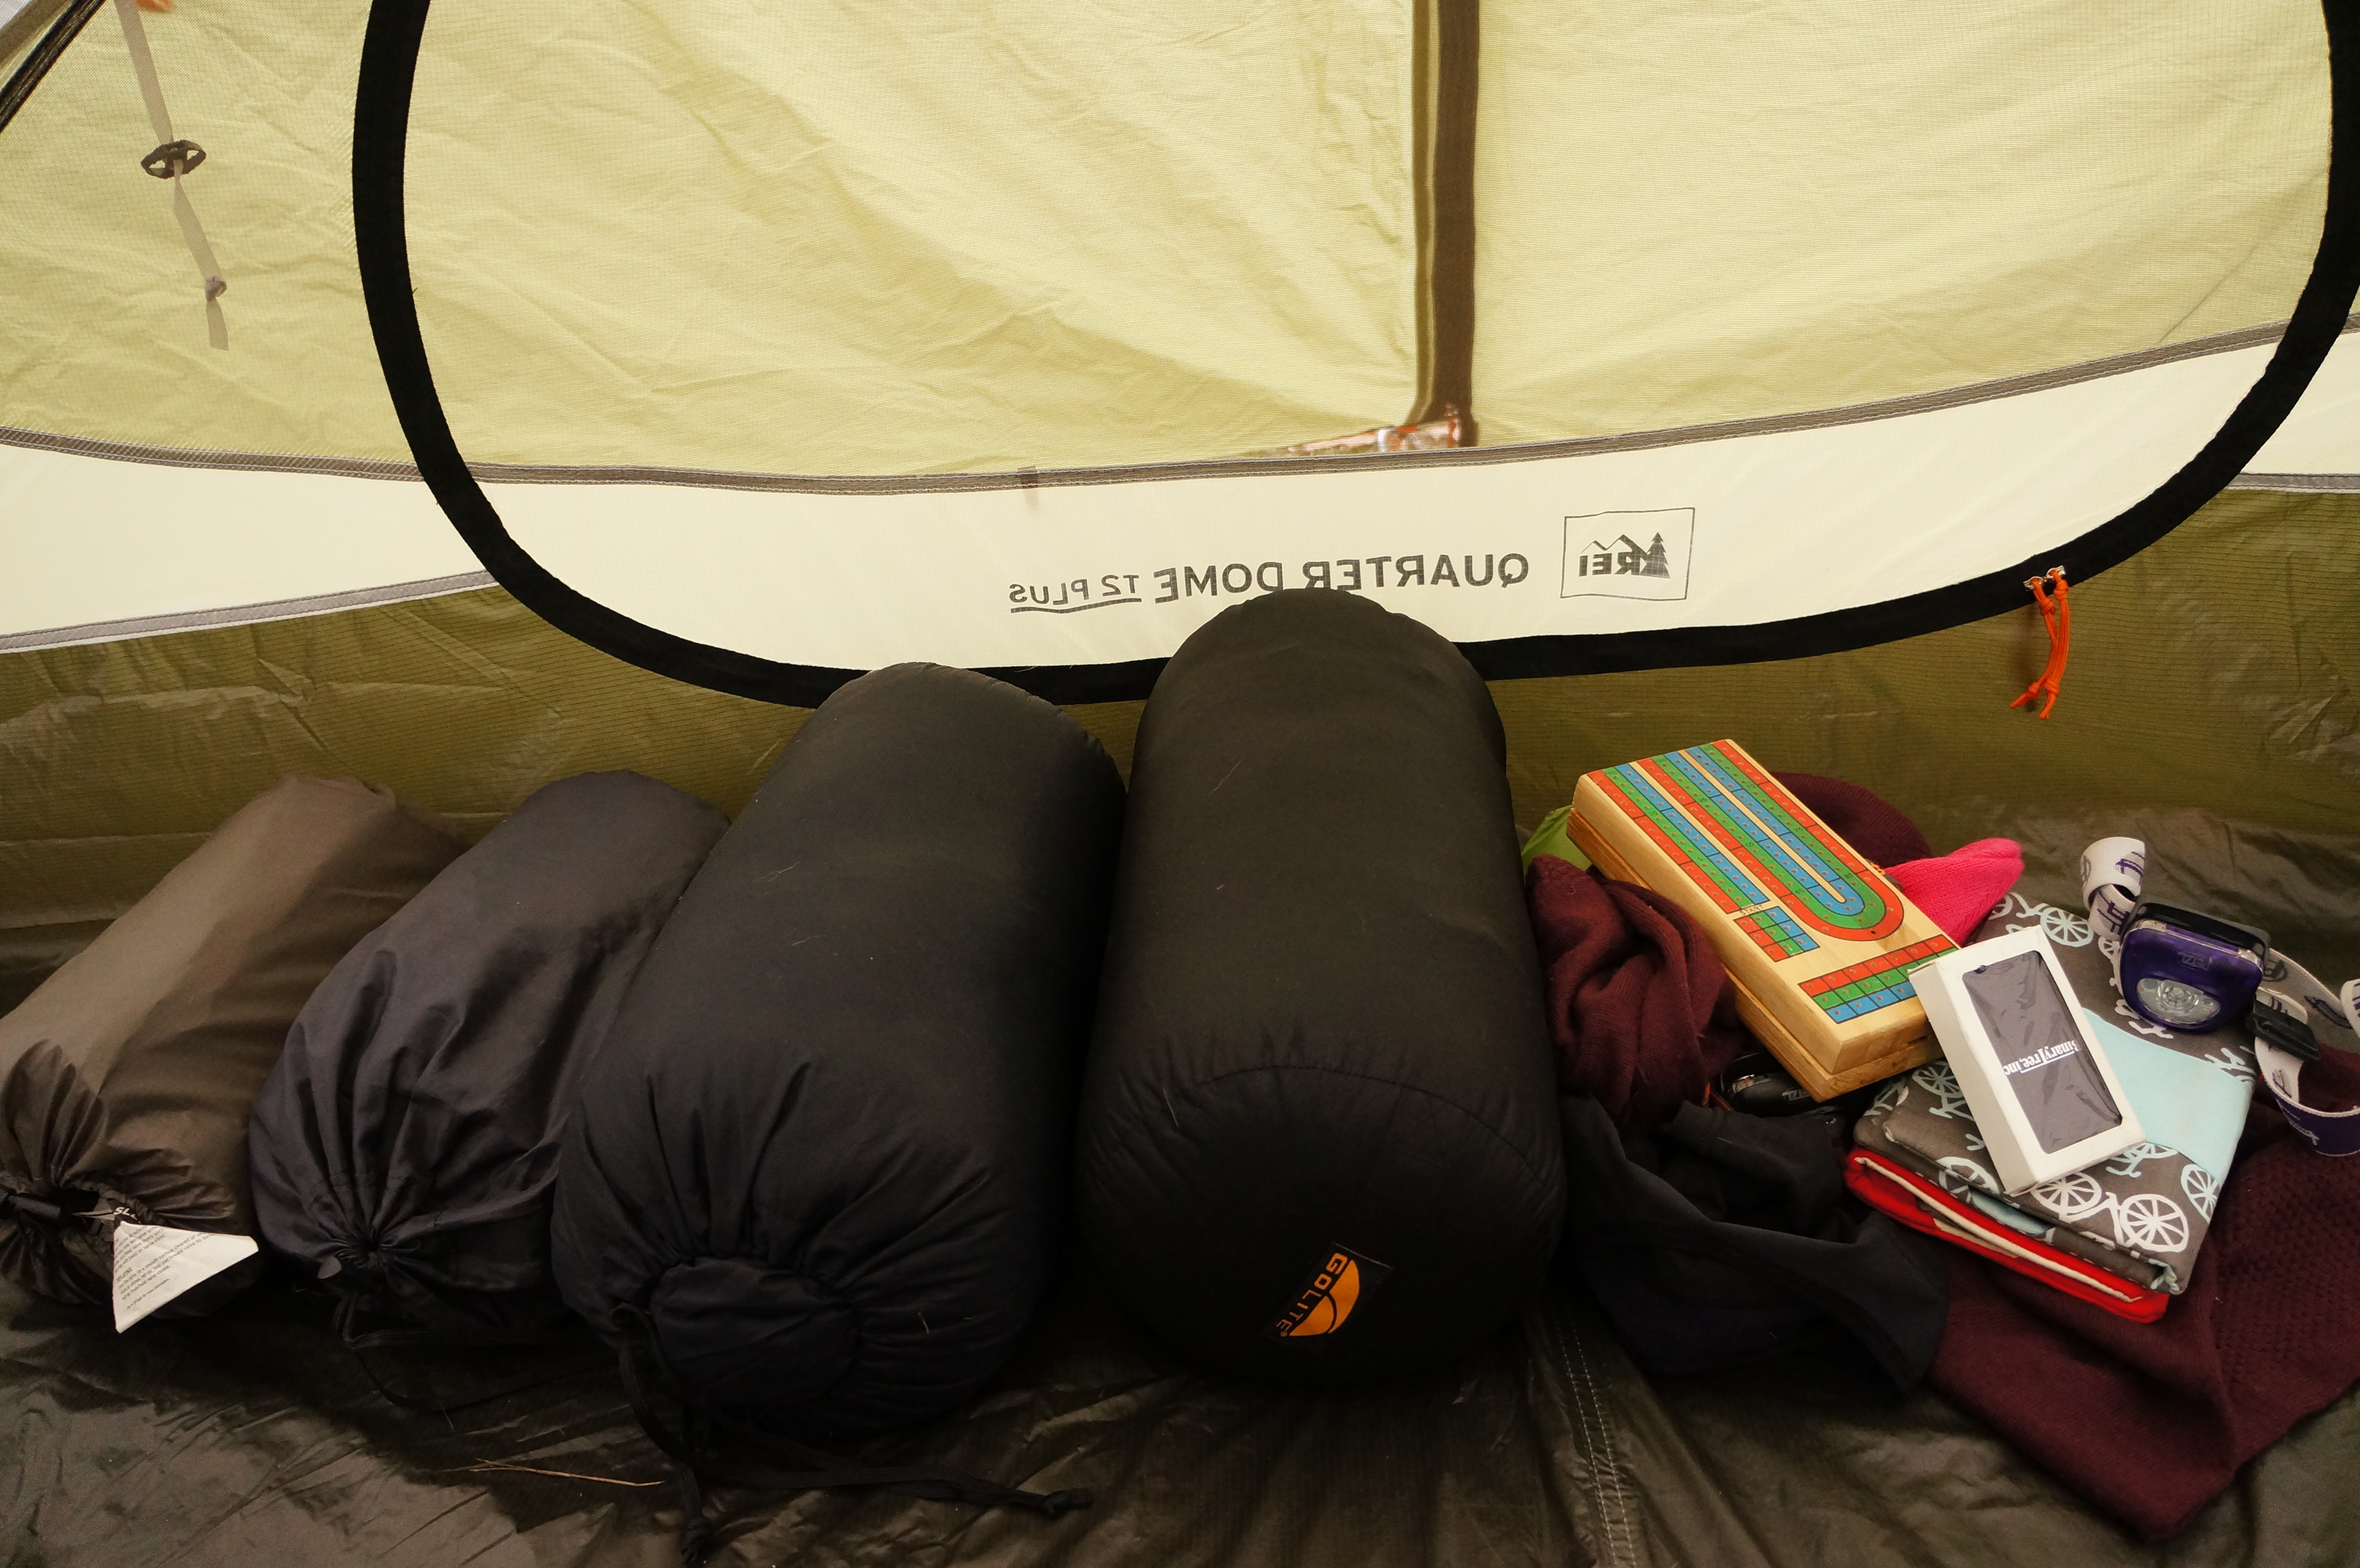
Tent – Having a good quality tent is a must for comfort. It must have low, waterproof fly for those days when it is pouring rain. The fly can be removed to provide more circulation in hot weather. Also, it is best to have enough space to relax in the tent. When you are caught in a bad rain, it is nice to pass the time playing cards. Finally, we like to have enough space under the fly but outside the tent to store bags and dirty shoes. We got our tent from REI (Quarter Dome T2 Plus).

snow and wet tent

A night where we needed both warmth and waterproofing.

Sleeping bags – We’ll be hitting some cool nights in Alaska – likely down near freezing. Warm sleeping bags are a must for a good night’s sleep! We considered buying silk liners for extra warmth, but decided we wouldn’t need it. We have 20°F (-7°C) bags, and will switch to 40°F (4°C)  when we get to warmer climates. We got our warm bags from GoLite.

Sleeping pads – The big choice here is whether to go with foam or inflatable pads. (We did not consider for a second to not have a pad!) Foam pads are great because they can’t pop/deflate, but inflatable pads are great because they pack up into a smaller space. Both get you off the cold ground which is helpful. We’re planning to use our self-inflating open-cell foam pads (from Therm-a-Rest). We’ll probably pack a patch kit in case we puncture them. I have read about some folks taking both types of pads… maybe that is excessive?

Pillows – Are not necessary for short trips, but they are essential for long-term comfort. After weeks and months of sleeping in your tent, you don’t want to develop a neck or back ache from not having a pillow! I think pillows are are very personal, and a good fit will depend on your preferences. We decided to go with small inflatable ones, which have two different fabrics on the two sides – one better for hot conditions, and one for cold.

sleeping bag and pads

Sleeping bags and pads in their stuff sacks. Kindles, cards, and headlamps are often used in our tent, too!

Stuff sacks – Preferably waterproof, you’ll need bags to store each of these items in. Usually they come with each item you buy. Don’t lose them! Without the bags, your supplies will never pack down into small places. Compression bags are also great for clothing, but we’ll get into that in another post.

And last, but not least…

Bear spray – This isn’t necessary for physical comfort, but in bear-prone areas, think of it as your cuddle buddy for sweet, unworried dreams. This is best used when touring solo!